Showing posts with label SEO. Show all posts

How to Submit a Sitemap for Blogger Blogs?

How to Submit a sitemap for blogger blog? In blogger blog Google have given us chance to increase Search Engine Rank using Goole Webmasters Tools. However Submitting a sitemap for blogger blog is essential for SEO.
Benefits of Google Webmasters Tools:
  • Your Website or Blog can easily get crawl in Google Search Engine.
  • You can know how many pages of your website are indexed by Google Search Engine.
  • You can know what url(s) are occurring error in search engine.
  • You can know about what keywords are visitors trying to search and which keywords have found your site. And so on...
Now, Let me explain the process on how to submit your blogger sitemap to google.

Step 1: First,go to Google webmaster tools and sign in with your gmail account which is used to login blogger.
Step 2: When you entered in site you will be asked to add a site.google webmaster tools
Add your blog url (example:kranthitips.blogspot.com). Note: Don't add with http or www.

Step 3: Next, it will asks you to verify your site. It is just to confirm whether you are the owner or not.

CLICK on the 'verify your site' link.

click the 'verify your site' link

Next,

choose verification method


Step 4: There are two ways to verify your ownership but, there is only one way for the blogger users to add a metatag.

copy the metatag
Step 5: Copy the metatag. Now, sign into your blogger account and click the layout button>Edit html and paste the metatag just after the head tag and save the changes.

paste the metatag like this
Now, go to Google Webmaster Page and click the verify button in the google webmaster tools and there will be a confirmation message saying that you have sucessfully verified.

conformation message
Now, you have to submit a sitemap for google to crawl your site.Go back to the google webmaster dashboard or (home) and click the 'Add' link which is next to your blog name and in the Sitemaps column.Then,you see this,


Choose 'Add general web sitemap' from the dropdown menu and type rss.xml or atom.xml next to your blog address as shown below


or
and click the 'Add General Web Sitemap' button.
Step 6: That's it.Now your sitemap is successfully submitted to google.Check 2 or 3 days after and you will see the detailed statistics of your blog(indexed pages,any errors,etc.). If you have any questions regarding this, you can ask here via your comment. Thanks for reading the article.

Google is Crawling my site very fast - crawling your site slow?

Why Google is not crawling my site? How to get my site crawl Google fast? Ok I have the solution. There are couple of problems for which you are going down for non-crawling Google your web posts. Listen carefully and try to solve those problems.
Problem No.1: Your website or blogs content is not original or it is duplicated from anywhere of the web. You have directly got it and have pasted into your web post.

Solution: Try to write your content with your own idea. If you can't then go to multiple websites with relevant content for your website and copy the contents in notepad you want. Then try to edit the article as you can. Then the article is renewed. And it is an original content finally.

Problem No.2: You have not made a sitemap on Google Webmasters Tools.
Solution: Go to Google Webmasters Tools and signup with your existing Google account and submit a sitemap. Now wait and let Google to crawl your site.

Problem No: 3 Your blog has no relevant links. So that Google consider that your blog is important.
Solution: You can post comment in the top rated and high ranked site and leave a link on the comment of your blog. Be ware that the websites content must to be relevant with your blog.

Primarily you can follow these instructions and I think you will get the result as like me.

I have followed those instructions so that Google is crawling my blog posts less than 1 minute. I have attached my blog posts screenshots.

How to Hide, Disable or Remove the Blogger Navbar?

How to hide,disable or remove the blogger navbar(navigation bar) from your blogger blog. The navbar is displayed in every blogger blogs. Removing the navbar of blogger is also a part of SEO. So now-a-days most of the web designer don't use navbar for their templates. Whatever before hide,disable or remove the blogger navbar(navigation bar) we must know about the navbar. Picture of Navbar is in the below.

blogger navbar

Blogger navbar allows users to easily navigate to other random blogs and it also has a feauture to search the blogs ,and mark any blog as spam. So,now you have a clear idea of what really a blogger navbar is.So, why so many people prefer to just remove the navbar inspite of the feautures it has like search,etc.Many people think that, it spoils the look of the blog,especially if your blog has differnet subtitle layout which looks too obvious to see for a visitor.Well, let me come to the actual point on how to disable or hide your blogger navbar.
How to Hide,Disable or Remove the Blogger Navbar?

Lets remove, hide, disable navbar of blogger blog.


Step 1: Sign in to your blogger account and click the layout button next to your blog name

click the layout button

Step 2. Next,click the Edit HTML tab as shown in the below picture.


edit html

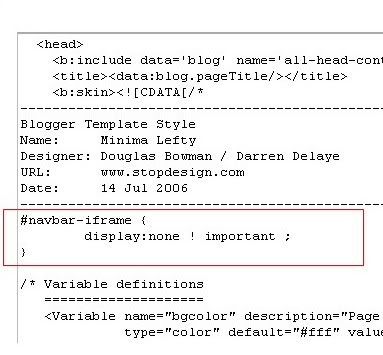
Step 3. Add the below html code as specified in the below picture.
#navbar {
      height: 0px;
      visibility: hidden;
      display: none;
}


add the code like this

4. Save the changes.

Now, you can see your blog without that navbar (this tip can only hides the navbar,it doesn't completely delete it).If you want the navbar to appear again,just remove that code and save the changes.
If you have any doubts,regarding this post,don't hesitate to ask.You can ask your doubts via comments to this post. Best of luck.
Solved: How to Hide,Disable or Remove the Blogger Navbar

How to Add Meta Tags in Every Blogger Post

How to Add Meta Tags in Every Blogger Post. After adding meta tags in your blogger posts your blogger posts become more SEO friendly. So add Meta Tags in Your Every Blogger Post. Follow the Steps below to do that.

Step:1 Login to Blogger account.
Step:2 Navigate to Design > Edit HTML
Step:3 Click on Download Full Template for your security purpose.
Step:4 Check the Expand Widget Templates box then..
Step:5 Add the following in the <head> section of your Blogger template. Enter this code below the Home Page code above you have just entered:
<b:if cond='data:blog.url == "http://url of your post"'>
<meta content='keywords pertaining to your post' name='keywords'/>
<meta content='crafted description of your post' name='description'/>
</b:if>

Here is an example of optimized meta tags for this post:
<b:if cond='data:blog.url == "http://www.blogger-tricks.com/2011/11/how-to-add-meta-tags-in-every-blogger.html"'>
<meta content='meta tags,optimize blogger,blogger SEO,search engine optimization, blogspot,blogger,blogspot.com,blogger.com,blogging,blog' name='keywords'/>
<meta content='Improve SEO by adding meta tags to your Blogger Blogspot blog. Step by step tutorial shows you how to add meta tags to the home page and a single post' name='description'/>
</b:if>
Step:6 Add your post URL, keywords and description. To find the URL of your post navigate to the post's page and copy the link showing in the address bar of your browser including the http:// prefix

Step:7 Click on the Save Template button.

Step:8 To check your description you can use the view source in your browser once you have navigated to the post page or a meta tag analyzer

Note: This method is suitable if you have a few key posts that you want to ensure you get maximum traffic on. If you have a lot of posts this manual method would be very tedious.

Analyze Your Blogspot Blogger Meta Tags with Tools
Once you have added meta tags to your blog you can use tools to analyze them to ensure their relevance. Aim for meta tag relevancy to page content of above 90%. To check this you can use a free meta tag analyzer tool such as Submit Express or SEO Centro


You Must remember these ...
  • Observe Character Limits
    To avoid problems ensure that you keep within the maximum character limits:

    Title Tag - Maximum Characters is 60
    Site Description - Maximum Characters is 150
    Keywords - Maximum Characters is 200

  • Title Tag Tweak
    If you have inserted the title tag tweak and it is highly recommended that you do so then you will need to add the code above after the title tag adjustment in the section of your template. Read more about adjusting title tags

  • Keywords
    Although some search engines no longer place too much emphasis on keywords some still do so it is worth adding keywords. Avoid using the same keyword more than 3 times. The maximum number of keywords recommended to be robot friendly is around 20.
In this Blogger meta tag tutorial I have discussed the best way to add meta tags to a Blogger blog (Blogspot blog) to improve search engine results given the limitations of the Blogger platform. To optimize your meta tags I have included links to free meta tag analyzer tools. Keep sound.

How to Add Meta Tags to Blogger Blogs for SEO

Adding Meta Tags are Most Important for SEO your blog. In this Blogger tutorial I will show you the best way to add meta tags to your Blogger blog (Blogspot blog) to improve the your Blogger SEO platform.

First of all, I would like to teach you about Meta Tags what are we going to our blogger Blog. If you are totally new and ignore about meta tags read the passage below about Meta Tags.

What are Meta Tags?
Meta tags are HTML tags that provide additional information about your blog that is unseen by visitors but available to search engines. The meta description tag, for example, provides a short summary of the page content. The keyword meta tags show the keywords and keyword phrases a visitor might use to find your blog. Because of abuse of meta tags search engines have become smarter and most no longer place emphasis on keywords to establish page ranking however keyword meta tags are still used by some search engines so it is a good idea to include them.

Know about Limitations of Blogger and SEO
Blogger is not properly Optimized Seo friendly. Meta descriptions and keywords are not supported by blogger.com by default. Title tags are also not optimized. But where is will there is a way. The webmaster has made a way to use Meta Tags to Blogger blogs. But a disgusting matter is you will have to add all the Meta Tags all alone and manually.

How to Add Meta Tags to a Blogger Blogspot Blog Home Page?

Follow the following steps to add Meta Tags To your blog correctly.

Step:1 Login to Blogger account.
Step:2 Navigate to Design > Edit HTML
Step:3 Click on Download Full Template for your security purpose.
Step:4 Check the Expand Widget Templates box then..
Step:5 Press (Ctrl+F) to Find the lines below which will be near the top of your template:

<head>
<b:include data='blog' name='all-head-content'/>
<title><data:blog.pageTitle/></title>

Step:6 Paste the following code immediately below
<title><data:blog.pageTitle/></title>

<b:if cond='data:blog.url == data:blog.homepageUrl'>
<meta content='Your blog description here' name='description'/>
<meta content='Your blog keywords here(separate by commas)'
name='keywords'/>
</b:if>

Step:7 Enter your blog description between the single quote marks under description. Maximum 150 characters

Step:8 Enter the keywords of your blog between the single quote marks under keywords. But Keywords are not so important now-a-days. Because most of the popular search engine has cancelled keywords as a part of SEO. Like: Google, Yahoo, Bing blah blah blah.

After adding the codes your Meta tags look like this below (it is an example):

<b:if cond='data:blog.url == data:blog.homepageUrl'>
<meta content='Find tips,tricks,tutorials,walkthroughs to customize your Blogger Blogspot blog.SEO,Banners,Adsense,gadgets,fixes,feeds,rss,help for beginner bloggers' name='description'/>
<meta content='blog,blogger,blogger.com,blogspot.com,blogspot,blogging,
tutorials,tips,blogger help,customize blogger,SEO,make money,gadgets,Google Adsense,banners, feeds,analytics,solutions
'
name='keywords'/>
</b:if>

Step:9 Click on the Save Template button.

Step:10 To see your description in action you can either navigate to your blog's home page and click on view source in your browser. In Internet Explorer you will find this option in the view menu. A text document will appear which you can scroll through. You will see your description near the top of the document. Alternatively you can check your description in a free Meta Tag Analyzer tool such as Submit Express or SEO Centro